How Can I Get My A1c Down Quickly?

Timers are incredibly useful mechanisms in games.
They can be used to create cooldown effects, delay methods from executing immediately, or simply show the histrion how much time has passed in a game.
So, how do you measure out time in Godot?
Godot includes a congenital-in Timer Node that allows y'all to specify a await fourth dimension which, one time it reaches zero, will fire a betoken that can be used to trigger other events in the game.
Timer Nodes, however, only count down. This means that to measure time elapsed (such as for a stopwatch, for example) you'll need to keep track of the amount of time that has passed by adding up the Delta Time every frame and storing information technology in a variable.
In this article, I'll show you how to use both Godot's built-in timer node and how to measure fourth dimension using variables.
Let's get started.
What you lot'll discover on this folio
- Using the Timer Node in Godot (inaugural timer)
- Filibuster a method using the timeout signal in Godot
- How to connect a signal via a script in Godot
- Create a 1-shot timer in lawmaking
- How to begin a game with a 3, ii, 1 timer
- Utilize a timer to limit weapon fire in Godot (cooldown)
- How to create a timer without using the Timer Node
- How to create a stopwatch mode timer (count up)
- How to brandish a time value in Godot in minutes and seconds
Using the Timer Node in Godot (inaugural timer)
The Timer Node is ideal for speedily and easily calculation a countdown timer to a scene.
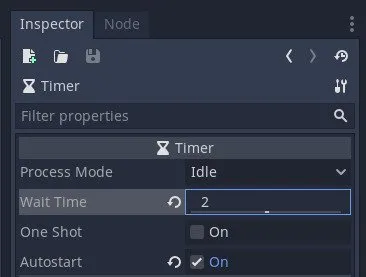
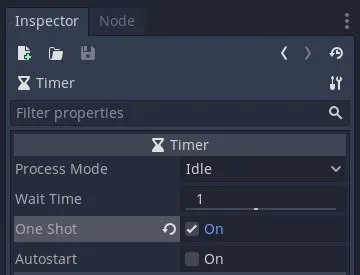
If you select a timer node in the scene tree, you'll run across its properties in the inspector to the right.
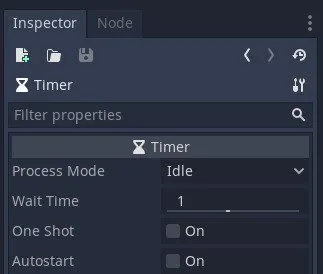
- Process Style: changes whether the timer is updated during idle fourth dimension or the physics stride.
- Wait Time: the elapsing of the timer in seconds.
- One Shot: if truthful, the timer repeats until it's stopped. Otherwise, it will count downwardly from the Wait Time to 0 only one time.
- Autostart: whether the timer will begin counting down as soon as it enters the scene tree and is ready.
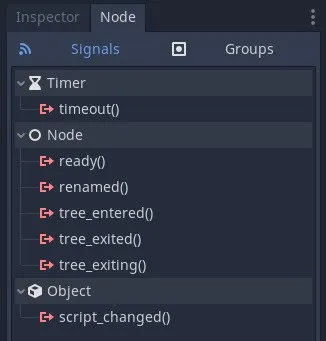
If y'all navigate to the Node tab, you lot'll see the bachelor signals the node has.
Signals are emitted when certain conditions are met. For case when a node is renamed, or when it enters the scene tree.
The timer-specific betoken timeout() is emitted when time_left reaches 0.
You tin connect this point to methods in a script to run them when the timer depletes.
The timeout indicate is emitted when time_left reaches zero and can be used as a trigger for other functions.
It's of import to note that methods connected in this fashion will merely run if the signal passes the same amount of parameters.
This ways that if you want to connect the timeout indicate to another method, it must accept the same parameters equally the timeout point (which is none).
In the example above, you can tell that the signals don't pass any parameters considering there is nix between the parentheses () of each signal .
How to filibuster a method using the timeout signal in Godot
The timeout bespeak can be used to delay methods in Godot.
Let'due south meet how this works with a simple scene. We'll create a scene with a characterization that volition alternate between shown and hidden every two seconds.
Get to Scene > New Scene . Click on 2nd Scene . This volition add a Node2D as the root of the scene. We utilise a Node2D because it has 2d transform properties such as position which allows us to motility it (and its children) around.
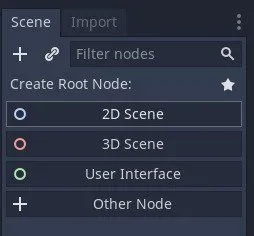
I'm using a 2D Scene for these examples, but timers work in any scene and in any dimension.
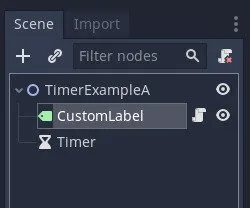
Double-click the Node2D to rename information technology. I named mine TimerExampleA .
Add a characterization and a timer as children by clicking the plus button and searching for them.
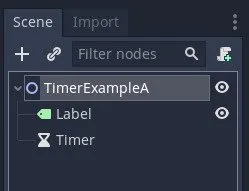
Select the label and add together some text in the Text property on the correct.
As for the timer, prepare the Await Time to 2, and enable Autostart . This volition make it so the timer starts counting down from ii seconds. I'm leaving 1 Shot unchecked because I want the timer to echo and so that I can run into when the timeout signal is emitted.
The default characterization doesn't have a built-in manner to toggle its own visibility so I'm going to add this functionality to the characterization by attaching a script to it.
I renamed the label to CustomLabel and used the Adhere Script button. You can always correct-click a node to view these options too.
Adding a script will open up upwards the script editor. For this example, I've created a unproblematic method to toggle the visibility of the label:
extends Label func toggle_visibility() -> void: visible = not visible Importantly, I've made sure that this method has no parameters so that the timer's timeout signal can safely connect to it.
Click on the timer in the scene tree and navigate to the Node tab to display the timer's signals. Double-click on the timeout signal to open the connection dialogue.
Keeping the default proper noun of _on_Timer_timeout() creates a new method automatically with that name.
This naming convention is useful to keep track of what's triggering the method just, for this case, I'm going to use the toggle_visibility method we but created.
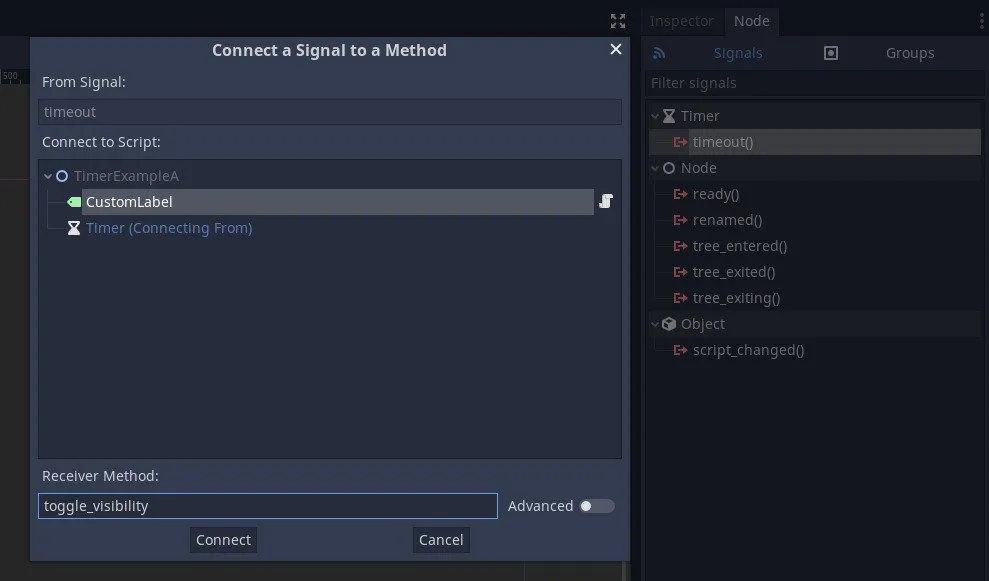
Double click the timeout signal to connect it to another method.
Once continued in this mode, there are a few UI elements that tin can help to keep track of signals inside the editor.
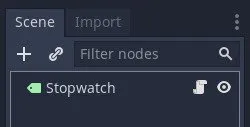
Start off, the timer has a new betoken icon in the scene tree.
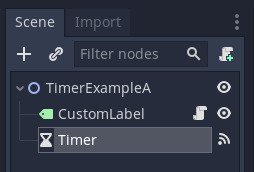
The betoken icon shows that the timer node is connected to a method.
The indicate likewise lists what Node and methods it'south connected to. You tin can disconnect signals here too.
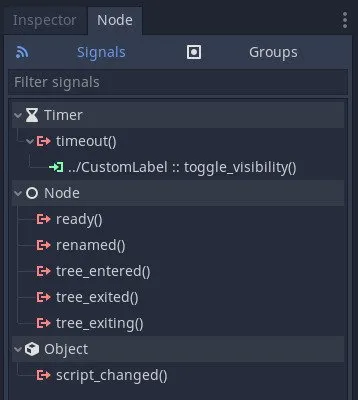
Helpfully, the signal lists its connections in the node tab.
Finally, you can click this icon in the script editor to see what signals are continued to the method.
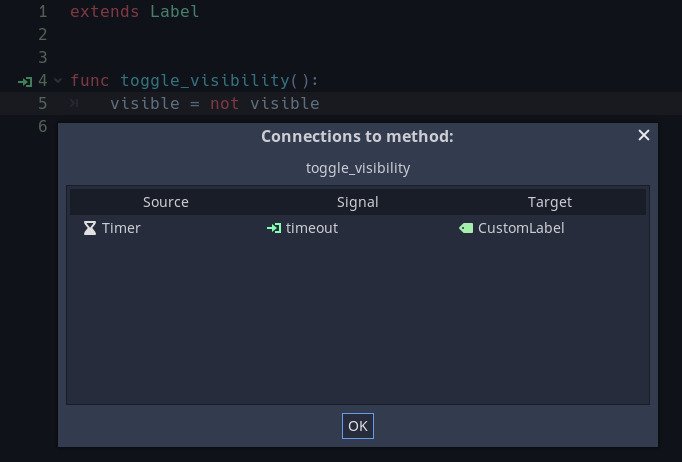
You tin also check active connections to methods from the method in script editor
If yous printing F6 to run the scene, y'all'll meet the label wink every two seconds.
How to connect the timeout signal via a script in Godot
Connecting signals in this style has its benefits. One of which is that nosotros're able to easily meet what signals are continued to in the editor.
However, information technology'southward as well possible to connect and disconnect signals during run-time via scripts.
Hither's how:
Equally a general rule, parent nodes expect afterward their child nodes so I'1000 going to use TimerExampleA to manage signals betwixt CustomLabel and Timer .
Here'due south how to connect the timeout() signal to the CustomLabel:
extends Node2D # Nosotros enshroud the children should we need to access them over again onready var timer := $Timer onready var label := $CustomLabel func _ready() -> void: timer.connect("timeout", label, "toggle_visibility") The timeout signal is connected every bit shortly as the TimerExampleA node has entered the scene tree and is fix, but you can connect or disconnect signals from anywhere in a script which makes this a powerful tool.
Create a i-shot timer in code ()
Information technology's likewise possible to create a one-shot timer on the wing. It begins counting down immediately and frees itself from retention afterwards information technology emits its timeout signal.
# Creates a ane-shot timer that lasts wait_time before emitting the timeout signal var scene_tree_timer := get_tree().create_timer(wait_time) By combining it with the built-in yield function, we can delay parts of a method from executing.
For example, to delay the playback of a song until the timeout bespeak is emitted by the scene tree timer:
func play_song(delay_time: float) -> void: yield(get_tree().create_timer(delay_time), "timeout") # Play the song after delay_time # ... The born yield function is how Godot creates coroutines ( .
Typically, this is used when you only demand to burn down a timer one time and you won't restart information technology.
Which is helpful, equally information technology cuts out the demand for creating a timer node that'll exist redundant after one use.
How to begin a game with a 3, 2, 1 inaugural in Godot
Just like in the previous instance, where I used a timer node to update a label, it's possible to give timer nodes actress functionality by calculation a script.
Such as using a timer node to count down to the beginning of a game.
Like before, I'll be using the timeout signal except I'll be using it to trigger a custom betoken, counted_down, which passes a number forth with it to keep track of a count variable.
The counted_down signal tin can then be used to update a characterization or to trigger some some other function.
extends Timer signal counted_down(number) export var _count := five The export keyword allows me to change this in the inspector.
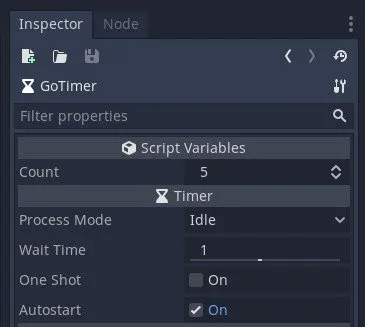
The export keyword is required for the count variable to show in the Inspector.
Connect the timeout signal to the _on_timeout() method in the ready step in the aforementioned manner as earlier.
Still, rather than connect to another object, this custom timer is connecting to itself.
func _ready() -> void: connect("timeout", self, "_on_timeout") func _on_timeout() -> void: emit_signal("counted_down", _count) _count -= ane if _count < 0: terminate() This works because the timer is repeatedly measuring a second. Then when the timer reaches null, it will emit the counted_down signal to pass along the current count and then reduce the count by 1.
The timer will then terminate once the count reaches zero.
How to use a timer node to limit weapon fire in Godot (cooldown timer)
While timers are often used to measure and display time, they are likewise useful for implementing gameplay mechanics.
Such as for limiting input. For instance, you lot may want to add a cooldown to a weapon or skill and so that information technology tin can only exist re-triggered after a specified delay.
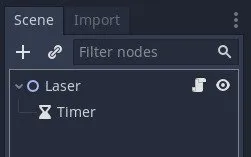
Let's say that you want to make a laser that tin only fire a second time after cooling downwards for one second.
Offset, attach a timer as a child.
Next, make sure the timer is set up to One Shot .
We can then use a script to limit input afterward the laser is fired.
# Laser.gd extends Node2D onready var timer := $Timer func _input(effect : InputEvent) -> void: if not timer.is_stopped(): render if event is InputEventMouseButton: if event.button_index == BUTTON_LEFT and result.pressed: fire() func fire() -> void: timer.outset() print("laser fired") Every time the histrion clicks, the Laser fires and starts the timer.
When the _input() function is triggered, information technology checks to see if the timer is running (or, specifically, if it has not stopped) and, if it is notwithstanding running, returns to prevent the laser from firing until the timer has stopped.
Using Animation Players equally timers in Godot
It's worth noting that you could also use an Blitheness Actor instead of a timer to limit fire or an activity. Subsequently all, an animation has a set elapsing equally well which you tin tweak in the editor.
extends Node2D onready var animation_player := $AnimationPlayer func _input(issue : InputEvent) -> void: if animation_player.is_playing(): return if event is InputEventMouseButton: if outcome.button_index == BUTTON_LEFT and event.pressed: fire() func fire() -> void: animation_player.play("burn down") print("laser fired")
How to create a timer in Godot without using the Timer Node
Timer nodes in Godot are keen for many things, but they're no utilize if y'all desire to keep runway of an unspecified amount of time.
For example, if you lot desire to continuously count up, and measure out how much time has elapsed, like a stopwatch.
For that, you lot'll need to add up time as it passes every frame (using the delta value), storing information technology in a float variable.
Here's how…
How to create a stopwatch way timer in Godot (count upward)
To create a stopwatch timer, create a new scene with a label and attach a script.
 At its simplest, we simply need to proceed track of i thing: the elapsed time.
extends Label var time_elapsed := 0.0 To keep track of how much time has elapsed, add together the amount of time that the concluding frame took (the delta value) to the time_elapsed variable every frame using the _process() method.
Similar this:
func _process(delta: float) -> void: time_elapsed += delta The delta value allows you lot to summate time independently of framerate. So if a frame takes longer to procedure, considering of increased graphics or cpu load for example, the time value is still measured accurately.
This will requite you a time value, in seconds, that you tin so use in your game.
Simply how can yous display the raw seconds value in a useful format?
Such equally in minutes and seconds, for case?
How to display a time value in Godot in minutes and seconds
If you're using timers to measure fourth dimension elapsed or time remaining, you'll probable want to show the time value in a format that the role player is used to. Such as in minutes, seconds and, peradventure, milliseconds too.

Unless you're a car, you're probably used to seeing fourth dimension in minutes, seconds and, sometimes, milliseconds.
Hither's how…
First, you lot'll need to calculate the minutes, seconds and milliseconds individually.
For this to work, you'll need a base fourth dimension value, which needs to be in seconds.
To summate the minutes, divide time by 60.
var minutes := time / 60 Y'all might have noticed that this integer division returns a float instead of an integer. In this instance, we don't need to use an integer considering we tin chop off any decimal places when nosotros insert the value into a cord.
To become the seconds, you'll need to get the remainder after dividing by lx using the born fmod function. The fmod function is a modulo function that specifically works with floats.
var seconds := fmod(time, 60) Modulo is a calculation that returns the remainder of a value afterward division past another. In this case, we're using information technology to get the number of seconds that don't make upward a whole minute.
We're using the fmod function specifically considering we're working with floats. If we were using integers, we'd use the per centum symbol %, which is how modulo typically works, and how information technology works in other languages:
# Prints xl impress(100 % 60) To get milliseconds, utilize the fmod function just, this fourth dimension, with a divisor of 1. Just like when getting the seconds, this will return a residuum except, in this case, it will be the remaining corporeality that doesn't make up a whole second. We'll chop off any extra digits when we format the string.
var milliseconds := fmod(time, one) * 100 Next, insert the minutes, seconds and millisecond time values into strings using format specifiers. We'll use the decimal integral d to insert the decimals nosotros've calculated above. We also define the padding as 02 which will make sure the value has two characters. The 0 here makes any padding a "0".
var time_string := "%02d:%02d:%02d" % [minutes, seconds, milliseconds] In this example, I'm using the decimal integral d to insert the calculated time values. Defining the padding as 02 volition make certain that each value has two digits. The 0 makes whatever padded value a zero.
Here'south what all of that looks similar in a reusable method:
func _format_seconds(fourth dimension : float, use_milliseconds : bool) -> String: var minutes := fourth dimension / 60 var seconds := fmod(time, 60) if non use_milliseconds: return "%02d:%02d" % [minutes, seconds] var milliseconds := fmod(time, 1) * 100 render "%02d:%02d:%02d" % [minutes, seconds, milliseconds] The method takes the time in seconds and returns a formatted string which can exist displayed using a label node.
Notation that I added a 2d boolean parameter called use_milliseconds, which can exist used to switch between showing milliseconds or non.
The label's text tin be updated in the _process() method which is called every frame. The _delta parameter is the time in seconds betwixt the electric current frame and the final frame and will vary depending on the framerate.
extends Characterization onready var countdown := $Timer func _process(_delta : bladder) -> void: text = _format_seconds(countdown.time_left, use_milliseconds) Godot throws a alarm if a parameter isn't used in the method. To avoid this, I've prefixed parameters with an underscore "_" to point to the editor to ignore them.
Now it'due south your turn
How are you using timers in your project?
Are you lot using the Timer Node, or are you making them via scripting?
Whatever it is let us know by leaving a comment.
Image Attribution
Godot Engine Logo (edited for apply on this site) past Andrea Calabró licensed under a Creative Commons Attribution 4.0 International License (CC-By-iv.0 International) https://creativecommons.org/licenses/by/4.0/.

My favourite time-saving Unity assets
Rewired (the best input management system)
Rewired is an input management asset that extends Unity's default input system, the Input Managing director, adding much needed improvements and support for modernistic devices. Put merely, it's much more advanced than the default Input Managing director and more reliable than Unity's new Input System. When I tested both systems, I constitute Rewired to exist surprisingly like shooting fish in a barrel to use and fully featured, and then I can understand why everyone loves it.
DOTween Pro (should be built into Unity)
An asset and so useful, it should already be built into Unity. Except it'south not. DOTween Pro is an blitheness and timing tool that allows you to animate anything in Unity. You lot can motion, fade, scale, rotate without writing Coroutines or Lerp functions.
Easy Relieve (there's no reason not to utilise it)
Easy Save makes managing game saves and file serialization extremely like shooting fish in a barrel in Unity. Then much then that, for the time it would take to build a save system, vs the cost of buying Easy Salve, I don't recommend making your own save arrangement since Easy Save already exists.
Source: https://gamedevbeginner.com/how-to-make-a-timer-in-godot-count-up-down-in-minutes-seconds/
0 Response to "How Can I Get My A1c Down Quickly?"
Post a Comment